
Recently, we were involved in the recovery of a client’s datacenter where the Veeam Backup and Replication product was the primary means of disaster recovery. Without divulging details about the nature of the disaster, we’ll just say that it was infrastructure related (was not the result of a cybersecurity event) and resulted in total loss of local storage within the affected site. While the client did have a well implemented backup strategy, there was no formal disaster recovery plan or disaster recovery procedures. Certainly not ideal, but many small- and mid-size companies are in similar situations.
Threats of data corruption and ransomware are prevalent enough that most understand the need for backups, but the cost points of hot and cold site replication are often beyond reach. As we were brought up to speed on the client’s backup implementation, we realized that while Veeam had quite a bit of documentation about implementing their product, we struggled to find detailed instructions on recovery for our client's particular setup. We found several forum posts on the Veeam website with users in the same situation, but answers from Veeam typically pointed to documentation that was lacking the specific information we needed. There was nothing that really brought the information all together in what could be leveraged as disaster recovery procedures, and unfortauntely the path to recovery wasn't clear.
The client’s backup strategy consisted of the Veeam Backup and Replication application, which backed up VMware virtual machines using Veeam’s Scale-Out Backup Repository (SOBR). The SOBR product is an excellent method of implementing a backup strategy that automatically handles copying backups off-site into a variety of Cloud Storage solutions. Amazon S3, Google Cloud Storage, IBM Cloud Storage, and Microsoft Azure Storage are all supported out-of-the box, as are any other Cloud Storage solutions that support S3 Compatible APIs (such as Wasabi).
At a high level, Veeam SOBR backs up workloads to local storage using Veeam’s proprietary formats (which support compression and encryption). Once the local backups are in place, separate jobs work to copy the backup data to off-site object storage, typically in the cloud. In our client’s case, they leveraged Amazon S3 as the object-storage target and, to protect intellectual property, all backups were encrypted. We should also point out that Amazon S3 supports immutable storage. This is a great feature that provides added protection against ransomware, ensuring backup files cannot be modified once uploaded to the cloud. Unfortunately, there is an added cost to this which must factor into a company's disaster recovery risk analysis.
We're not endorsing Veeam Backup and Replication as the best disaster recovery strategy, or even as the best backup solution. As with any software, there are stengths but also areas with room for improvement. That said, Veeam is a leading backup and recovery solution, and for many businesses it is cornerstone of their backup strategy.
At this point in our blog we’ve adequately described the disaster recovery situation we encountered. The client is looking at total storage loss on the site, with the local disk backups unrecoverable. All is ready to describe the recovery procedures from Veeam SOBR utilizing backups located in Amazon S3.
The first step in this disaster recovery process is generally the most nerve racking: determining whether backups are actually available or not. Backups were in place and should have been running, therefore they should have backups in S3. This particular client even performed monthly backup testing, and provided the documentation to prove it. After reviewing this documentation, we realized that the monthly backup tests were performed against local storage backups on disk, which were not available. Therefore, it was yet-to-be-determined whether we would even have any backups to recover from.
Navigating to the Amazon S3 buckets using the AWS Console, we did see a folder called Veeam which numerous sub-directories and various files with cryptic names and timestamps. It appears to us the data was there, but it wasn’t a simply matter of downloading the backup files and asking Veeam to restore it. The Veeam Backup and Recovery application is the only means to recovering backups from SOBR object-storage.
If you are starting from scratch, you will need to install Veeam Backup and Replication somewhere, preferably wherever your recovery efforts need to occur. This could be on a local workstation (it needs enough storage to pull down the backups you’ll need), on an existing server, or a new server spun up in the cloud, like Amazon EC2. Since we were recovering a VMware environment, we decided to install it on a new VM we spun up within an ESXi host at the site we were recovering. We won’t go into the details here as this is likely to be different depending on your recovery environment. However, we’ll list a few of the high-level steps that we performed. To aid the speed of recovery, this information should be included in your detailed Disaster Recovery Procedures (DRP) documentation:
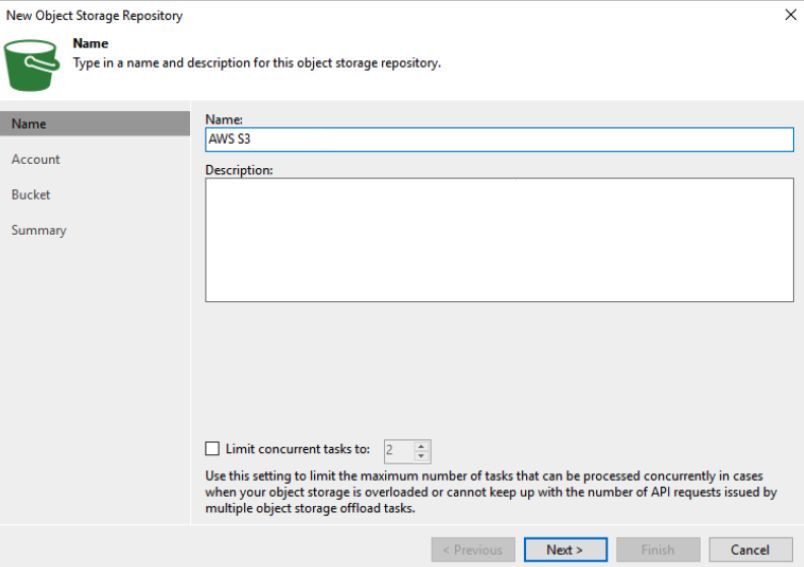
With Veeam installed, launch the Veeam Backup and Replication application. Navigate to the Backup Infrastructure menu and right click Backup Repositories. Select New Backup Repository and then select Object Storage.
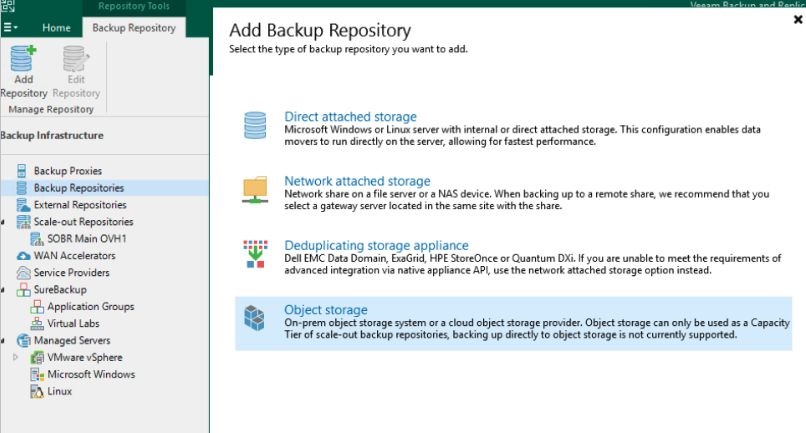
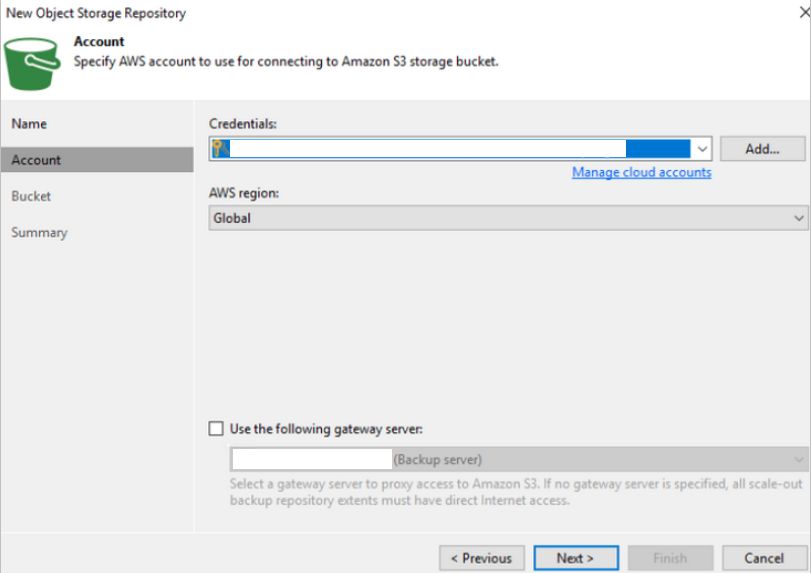
Select the cloud storage solution where the backups were implemented. In our client’s case this was Amazon S3. Including this information in your DRP will ensure those not familiar with the backup solution are able to recover.
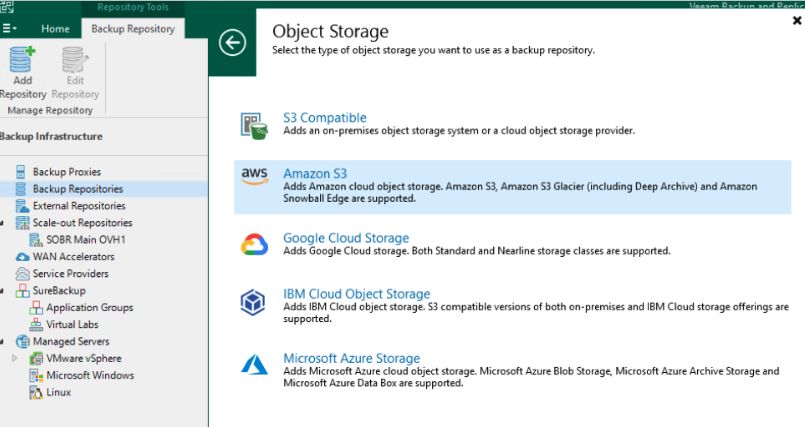
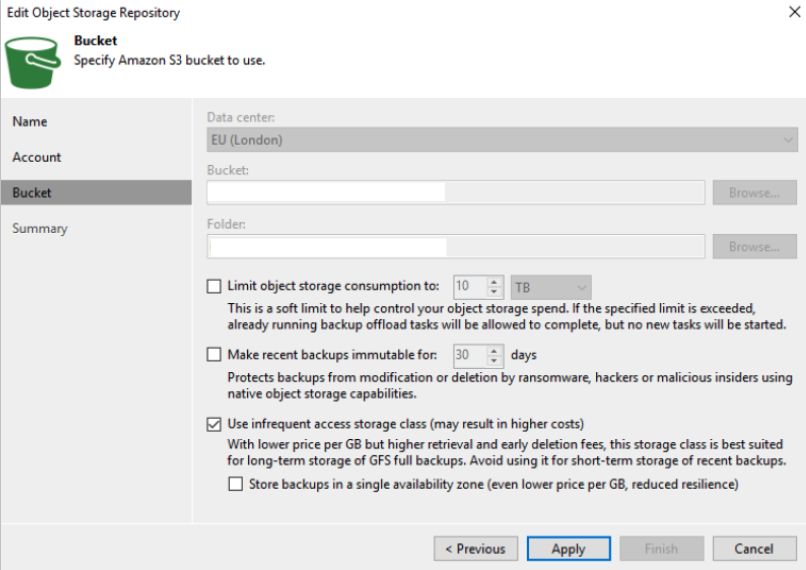
For Amazon S3, multiple options are available with the Capacity Tier depending on the required features, limitations, and costs. In our client’s case, backups were stored in S3 Infrequent Access (IA).
Provide a Name and Description for the Backup Repository.
The next screen with prompt for the credentials for the S3 bucket. This is going to be an AWS S3 Access Key and Secret Key. Secure locations of this should be included within the DRP, but if unknown you will need to create a new user in AWS and grant permissions to the bucket through an IAM Policy. Click the Manage cloud accounts link to add the credentials and select them in the drop-down.
On the next screen, you will click the Browse button and select the S3 bucket. The region should be included in the DRP, but if unknown this can be found within the AWS Console. If the Infrequent Access option was used with the backups, you can select the appropriate checkbox. However, it did not appear to have any effect on the accessibility of backups already uploaded to S3. Once selected, click Apply to add the repository.
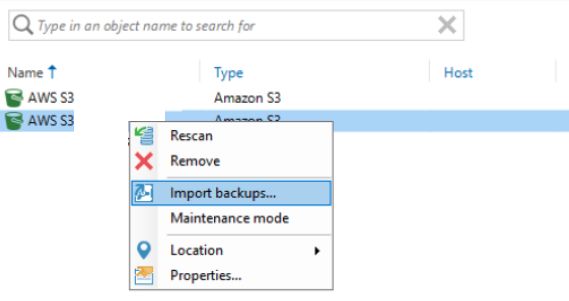
With the Backup Repository added, we need to rescan it. Right-click the repository and click Rescan. This may take some time.
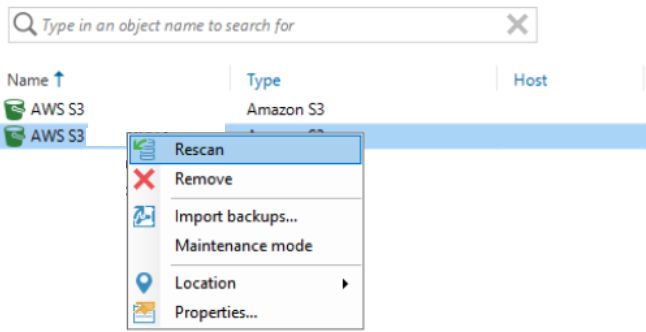
We now will import the backups. Right-click the repository again and select Import backups… This may take some more time.
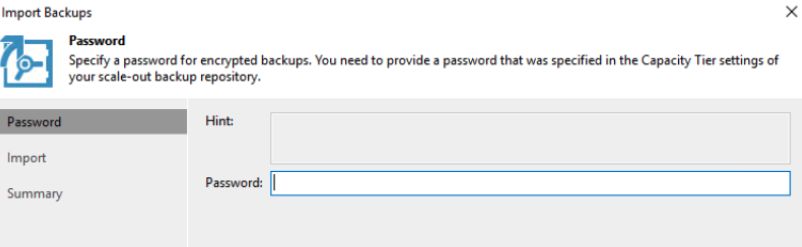
If the backups were encrypted, you will be prompted to enter the password. Your DRP should include instructions on how to obtain this password. Without it, your backups are useless :-(
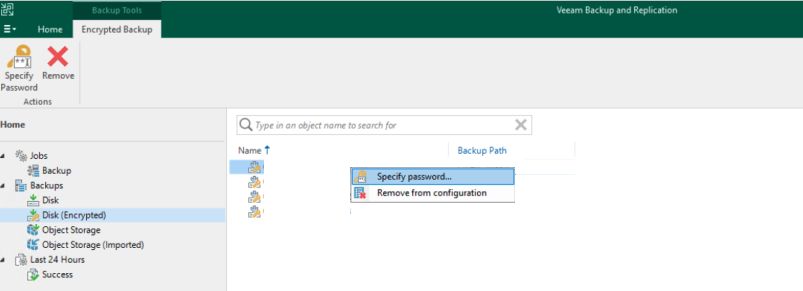
Now to identify the backups. Navigate to the Home section of the application and review what’s available under Backups. This threw us for a bit of loop and brief panic as for a few moments we were afraid we didn’t have the needed backups. Encrypted backups will initially show up under Disk (Encrypted) selection and are not automatically included under Object Storage (Imported), which is where we expected them to be – you know, because they are Object Storage backups.
Click on Disk (Encrypted), and for each backup job right-click and click Specify password… Provide the backup password, the same one from the previous step.
Once complete, the backups will appear under Object Storage (Imported). You may now view the backups and recovery points available, and use Veeam to recover workloads as you normally would from disk. The next sections will briefly discuss the options we employed on this particular engagement.
Assuming your Veeam server has local network connectivity to a vCenter or ESXi host you wish to recover to, you will connect these services to Veeam. If you do not have the luxury of local network connectivity (i.e. you need to recover a virtual appliance to bring the network up), skip to the next step where we’ll explain an alternative.
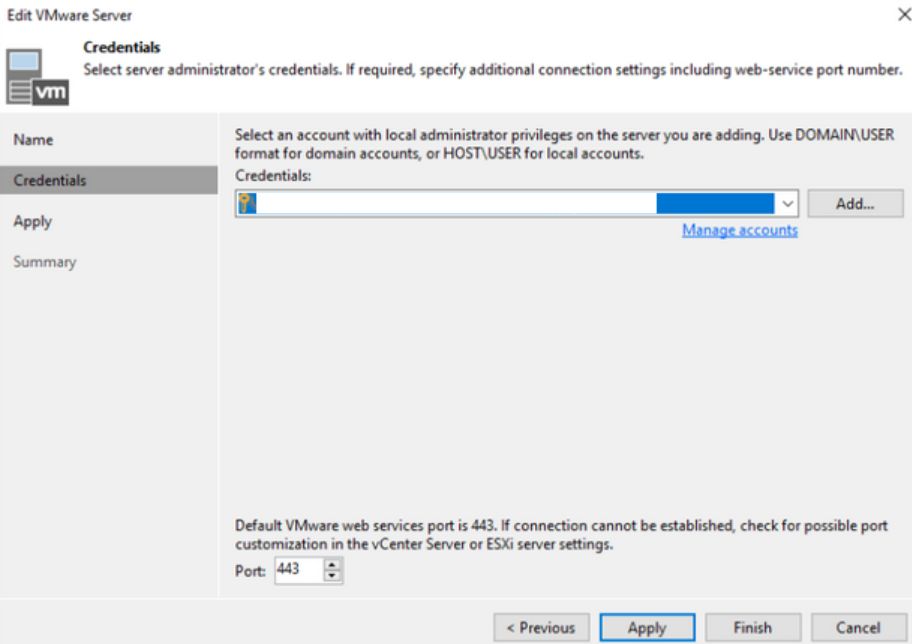
To recover directly to vCenter or ESXi, we will need to add the vCenter or ESXi server through Veeam. Within the Backup Infrastructure section, right-click Managed Servers and select Add server… Select VMware vSphere. Then select vSphere. Provide the IP address or DNS name of the vCenter or ESXi host you want to recover VMs to.
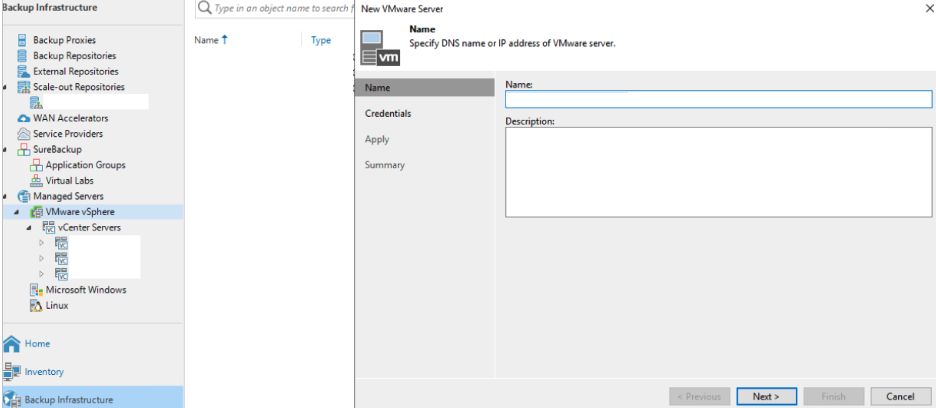
Next, set the credentials to connect to the vCenter or ESXi host. Click Apply to create the connection.
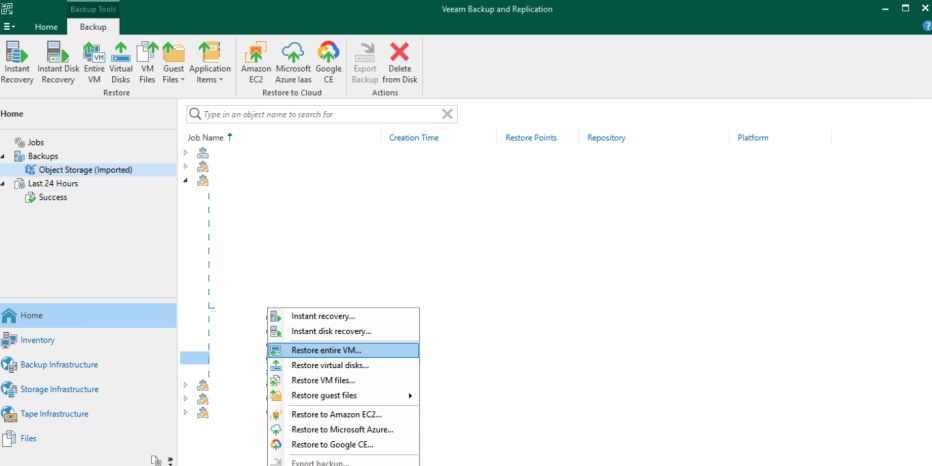
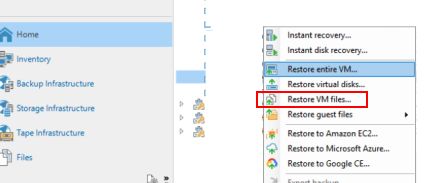
To recovery a VM directly, navigate back to the Home section of the app. Locate the backup and select Restore entire VM… As you follow the restore wizard, the vCenter or ESXi host will be available as a valid destination for recovery.
Once we had access to our backups, we had sort of a chicken and egg problem to deal with. The client’s datacenter infrastructure was essentially intact, except the storage media was replaced. However, their networking architecture relied on a virtual appliance to facilitate local VLANs, routes, and firewall rules. While this all could have been rebuilt manually, the most expeditious route was recovering from backup. That’s what’s it for, after all!
The solution was exporting the VM files from Veeam, manually copying them to an ESXi host, and importing the VM into the environment. With the networking stack in place, we were able to build another Veeam server locally, repeating the steps in this blog post, and recover the remaining virtual machines, including the vCenter.
We were amazed at how quickly Veeam was able to restore VMs using the direct vCenter to ESXi approach compared to copying files manually. While it made sense to copy the small VM files manually for the single network appliance (just a few gigabytes), it would have taken days or weeks to copy the remaining VMs using this method. Using the direct vCenter/ESXi recovery approach (see #3 above), the data was restored in just a few hours. Therefore, use the following steps only as a last resort.
This method requires a means of accessing the ESXi host directly, through the web console and SSH. Note that it is possible to register a VM solely with the command line, if needed. If you don’t already have this access (i.e. you only have console access), you have some networking to figure out. The following commands can be used to allow access through the local ESXi firewall.
First, export the VM files to your local machine. Identify your backup and select Restore VM Files… from the menu. This will open another wizard to select the recover point and source of the files. Veeam provides additional information on this recovery method here.
With the files exported, review the .VMX file to determine the restore location of the VM. You may need to edit this value depending on whether you can write to the original file location.
You will then need to manually copy these files to an ESXi host in the datacenter. Since Veeam is installed on Windows, a utility such as WinSCP is a convenient application to transfer the files via SSH.
With the files transferred, it then just a matter of registering the VM.
Information provided is for educational purposes only or for use in legal pentesting engagements and must not be used for illegal activities.
This website does not use cookies or other technologies to track your activities. Please see our Privacy Policy.
Copyright © 2021-2023 Auspicious Security LLC